Download the latest version
Registering your Cylinder
Step 1 - Download the Mixergy App
Start by downloading the Mixergy App from the App Store or Google Play.
The app is where you’ll register your tank, set your heating schedule, and check your hot water levels.
Step 2 - Register Your Mixergy Tank
 When you open the App, you'll be asked to log in. If you have an account or have been provided with one by your housing provider, simply enter the email, password and tap 'Login'.
If you don't have an account, you'll need to create one.
- Click 'Create Account'
- Enter your details and address, then accept the Terms and Conditions.
- If your address doesn’t appear (common in new developments), please type it in manually.
- You’ll receive a verification email. Open it and click the link to confirm your account and log in the webpage version.
-
Once confirmed, please return to the Mixergy App to continue setting up your tank.
-
Didn’t get the email? Tap Resend Validation Email and check your junk or spam folder. Make sure to check your email and junk folder if nothing comes through.
-
Step 3 - Add Your Tank
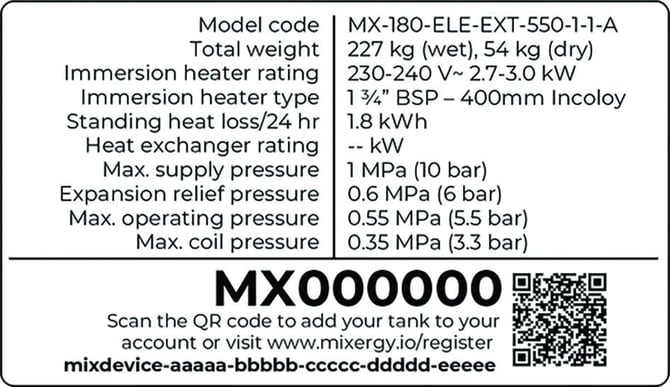
Once your account is created, you'll be asked to add a tank to your account. First, you'll need to add your tank details. To do this, you will require the information found on the label. This information will depend on the controller model you have.
1.0 ControllerThe 1.0 Controller labels will display a QR code and a 25 character Mixdevice code (25 characters) at the bottom. Scan the QR code or add the mixdevice code manually. |
 |
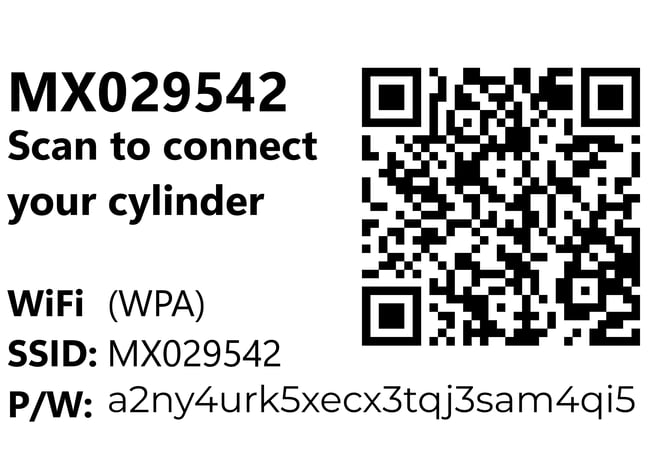
2.0 ControllerThe 2.0 Controller labels will display a QR code and a P/W in place of the mixdevice code. Scan the QR code or add the mixdevice code manually. |
|
Step 4 - Turn on Automatic Schedule
 Auto Schedule learns your hot water habits and creates a heating plan for you. It helps make sure you have hot water when you need it while avoiding unnecessary heating.
We recommend Standard (with Grid Assistance) designed to balance savings with comfort.
You can change these settings at any time or create your own Manual Schedule.
Step 5 - Confirm your heating type
 This is usually set by your installer, but you can check in the app under Tank Settings:
- Direct Electric – heats directly using electricity
- Indirect – works with your home’s gas or oil boiler
- Heat Pump – uses a connected outdoor heat pump OR if you have a Mixergy iHP X
If you’re unsure, please contact your developer, housing provider, or installer.
Step 6 - Tank Address
 If your tank is located at a different address than your user account, you can specify this here.
-
Same as my address - this will use the same address as your user account. It will display this address when selected.
-
Different address - this will open up the postcode lookup and manual entry functions
Tank location is a factor for automatic schedule and Grid Assistance.
Step 6 - Timezone set up
 Select the timezone where your tank is located. This ensures your automatic schedule and energy usage are shown correctly.
It’s set to the UK timezone by default.
Step 7 - Connect to the internet
To use the Mixergy app, your tank needs to be connected to the internet. If it hasn’t been connected before, follow the steps for your controller version. This usually applies if you’ve just moved in or you’re setting it up with your Installer.
1.0 Controller
Connecting a 1.0 Controller will require either a TP-Link Adapter or a direct Ethernet connection. A TP-Link adapater should be setup by your installer, but may need pairing. For more information, please see Connect your tank to the internet.
If a direct Ethernet connection is required, please speak to an installer.
2.0 controller
A 2.0 Controller can be connected wirelessly or using a direct Ethernet connection. The wireless connection process enables you to link your tank to your home Wi-Fi through the App. Once you've added your tank, follow the guidance in the App to connected quickly.
If a direct Ethernet connection is required, simply plug the Ethernet cable into the slot at the bottom of the Controller.
Step 8 - Start using your tank
Your Mixergy hot water tank is set up and ready to go. Check out these quick guides to get the most from your system.
- Checking your hot water and using Boost
- Automatic vs. Manual Schedules
- Holiday Mode
- Setting your energy tariff
- Setting up your solar panels with the Mixergy Solar X
- If you can't use the App - how to use the Mixergy Gauge
Need more help?
Call our Homeowners & Residents line:
- Phone: 01865 595 875
- Hours: Monday to Friday, 09:00 – 17:00