The Mixergy App

Registering your cylinder, configuring settings and monitoring everything from hot water levels to energy consumption.


The Mixergy App enables you to get the most out of your Mixergy cylinder. Whether you want to set schedules, monitor use or intgrate a smart tariff,  the App is there to help you.

Downloading the Mixergy App 

The App is available to download for free through the Apple App Store or Google Play 

When you open the app for the first time, you’ll need to create an account. After that, the app will guide you through registering your tank so you can start using its features.

If you don’t have a smartphone or prefer using a different device, you can still access most features on our Mixergy.io dashboard. Just open a web browser on your computer or tablet and go to Mixergy.io to get started.

Registering your tank 

Once you've created your profile, you'll be asked to add a cylinder. To do this, you'll be asked for some information: Mixdevice code, Automatic Schedule Control and Heating Profile. These are outlined below. 

Mixdevice code

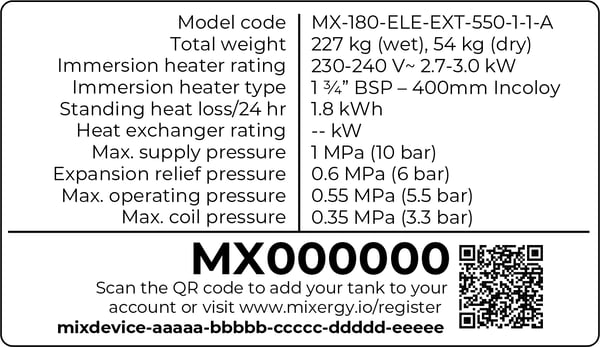
This is a 25-character identifier unique to your tank. It will look like this: mixdevice-xxxxx-xxxxx-xxxxx-xxxxx-xxxxx. You can enter this manually or use the QR code label on your cylinder. 

MX label example

Automatic schedule control

When setting up your Mixergy system, you can choose whether to enable Automatic Schedule Control. This feature uses a machine learning algorithm to optimise your schedule based on your hot water usage. If your system is linked to a smart tariff, it will also consider energy pricing to help you save money and use energy more efficiently.

You will be given four options:

  • Off: No automatic adjustments. You must manually set your hot water schedule.
  • Standard (with Grid Assistance): A balanced approach that aims to save money while ensuring you have enough hot water.
  • Economy (with Grid Assistance): Maximises savings but comes with a higher risk of running out of hot water if your usage is higher than expected.
  • Grid Assistance Only: Requires a manual schedule but enables Grid Assistance, a Demand-Side-Response (DSR) feature that helps balance the electrical grid by adjusting power usage when needed.

You can change this setting later by selecting ‘Tank Settings’ in the app's top menu or via the Mixergy.io dashboard.

Heating profile

Your heating profile determines your main heat source. You can choose from the following options:

  • Electric – Uses electricity as the primary heat source.
  • Indirect (e.g. gas boiler) – Uses an external heat source like a gas boiler.
  • Heat Pump – Uses a heat pump for energy-efficient water heating.

This setting can be changed later if needed.

Once you have selected your heating profile and completed the required settings, your Mixergy cylinder is ready to go!

Using the App

Home screen

The home screen has three key areas:

  • Hot Water – Tap here to access your tank. You can check and boost your hot water levels, manage settings, and view consumption data.
  • Device Management – Detect and connect a tank. Multiple tanks can be connected to a single account. 
  • Inbox – Find important notifications, including feature updates, customer service messages, and tank-specific information.

View your hot water level

The home screen provides key information about your tank’s current status, including:

  • Mixergy consumer app - boost screenHeating Status – Shows whether your tank is currently heating or not. If it is heating, it will indicate the source of the instruction, such as:
    • A boost (activated via the app or gauge)
    • A user-defined heating schedule
    • A Demand-Side Response (DSR) event
    • A water sterilisation cycle
  • Hot Water Level – Displays the percentage of usable hot water in your tank.
    • Example: If the level shows 59%, that means 59% of the water is hot (represented in red on the graph), while 41% is cold (shown in blue).
  • Last Update Time – Located below the heating status, this shows when the Mixergy servers last received water measurements from your tank. This can be useful for diagnosing internet connection issues.

Boosting your tank

To heat more water, follow these steps:

  1. Drag the Boost button up to your desired hot water level.
  2. Release the button, and the tank will begin heating.
  3. The green portion of the graph shows the target hot water level your tank is heating to.
  4. As the water heats up, the red portion will increase until the target level is reached.
  5. The Heating Status below will update to reflect the boost in progress.

If you need to cancel a boost that was started via the app, simply tap "Cancel Boost".

Setting a manual heating schedule

You can schedule when and how much your tank heats by following these steps:

  1. Tap the "Schedule" tab at the bottom of the app.
  2. Press the "+" button to add a new schedule.
  3. Set the time and target hot water level for your tank.
  4. Tap "Save" to confirm your schedule.

Customising Your Schedule

  • You can set a different schedule for each day or copy the same schedule across multiple days.
  • You can also set your tank to maintain a minimum and maximum hot water level.
    • If the hot water level drops below the minimum, the tank will automatically turn back on until it reaches the maximum level.
    • If no maintain parameter is set, the hot water will gradually cool unless used.

By setting up a schedule that fits your household routine, you can optimise energy use and ensure hot water is available when you need it.

Example Weekday Schedule

  • Heat to 80% at 06:00 to cover morning showers.
  • Heat again to 40% at 18:00 in case of evening use (e.g. a bath or another shower).

Example Weekend Schedule

  • Heat to 70% at 08:00 for general use.
  • Maintain 15-25% hot water throughout the day to ensure hot water is always available when needed.

Default Schedule

If you don’t set a schedule, your tank will automatically follow a default schedule. This means:

  • Your tank will heat to 100% every day at 3:00 AM.

This can be useful when you first start using the system and are unsure of how much hot water your household needs. However, please note that this may not be the most energy-efficient or cost-effective option.

To optimise energy use and reduce costs, it is recommended that you set a custom schedule based on your household's hot water needs.

Please note: The minimum hot water level your tank can heat to will be approx. 
~40% for indirect tanks and 20% for direct tanks (this will be slightly different 
depending on tank size). After this initial heat, you will be able to heat in 1% 
increments.

Vacation mode

Vacation Mode stops your tank from heating while you’re away, temporarily ignoring any existing schedules until your return.

To activate Vacation Mode:

  1. Tap the aeroplane icon on the toolbar.
  2. Enter your departure and return dates.
  3. Confirm your selection, and your tank will remain off until the set return date.

This helps save energy and reduce costs while ensuring your tank resumes normal heating when you get back.

Setting your heat source

The Heat Sources tab allows you to choose how your tank is heated.

Setting a Default Heat Source

  1. Tap the "Heat Sources" tab in the app.
  2. Select your Default Heat Source – this will be used for all heating, including boosting and scheduled heating, unless a Custom Heat Source is set.
  3. Choose from:
    • Electric
    • Indirect (e.g. gas, oil, biomass)

Adding a Custom Heat Source

If you want to use a different heat source at certain times (e.g. to take advantage of cheaper off-peak electricity), you can:

  1. Tap "Add Heat Source" on the toolbar.
  2. Choose the heat source for that time period (Electric or Indirect).
  3. Set when it should be used.

For example, you might choose:

  • Electric during off-peak hours (e.g. Economy 7) when electricity is cheaper
  • Gas as the main heat source outside these hours

Solar Integration

If your system includes solar thermal or solar PV, your tank will automatically use any surplus solar energy whenever available, regardless of the heat sources selected in this tab.

Viewing hot water usage

The Measurements tab provides graphs that visualise your hot water usage and electricity consumption over time.

How to View Your Data

  1. Tap the Graphs tab in the app.
  2. From there you can view graphs for Hot Water Level, Power Consumption and PV Power (if available).
  3. To view data for a different day, tap Pick Date below the graph and select a date.
  4. Tap the tabs above the graphs to cycle through the different views. 

Screenshot 2021-03-09 at 09.35.11_0821   Screenshot 2021-03-09 at 09.35.16_0821

Understanding the Graphs

Hot Water Level Graph

  • This graph shows changes in your tank's hot water level throughout the day, based on heating schedules, water usage, and natural cooling.
  • Example:
    • The graph shows the hot water rising to 70% at 01:30, following the set schedule.
    • After 18:00, the hot water level dropped below 18% due to usage.
    • Since the schedule was set to maintain between 18% and 35%, the tank automatically boosted itself to 35%.
    • Shortly after this boost, a large draw event occurred, using the stored hot water. Without this boost, there wouldn’t have been enough hot water available.

Power Graph

  • This graph displays how much power was used by the immersion heater (if heating by electricity).
  • Example:
    • The graph shows three power spikes at 01:30, 18:00, and 20:00.
    • These align with the heating schedule and hot water usage, showing when the tank activated heating.

By analysing these graphs, you can ensure your heating schedule is efficient and make adjustments if needed to optimise energy use and cost savings.

Calculation of energy usage and cost

Using the Insights tab in the bottom right you will be able to see information on energy use and cost over time. To use this, you will need to add information on your tariff prices. To enter your tariff information:

  1. Tap the Menu button in the top right
  2. Select 'Automatic Schedule Control'
  3. Select 'Set Electricity and Gas Tariffs'
  4. Select a Heat source
    1. If heating with electricity:
      1. Enter your peak and off-peak electricity prices (e.g. Economy 7 rates).
      2. The app will use these rates to calculate an estimated cost based on when your tank was heated.
    2. If heating via an indirect source (e.g. gas, oil, biomass):
      1. Enter your tariff price (cost per kWh).
      2. Enter your tank’s capacity in litres (found on the label on the front of your tank).
      3. If you know the efficiency of your heat source, enter it for the most accurate estimate.
      4. If you don’t know the efficiency, the app will default to 80% efficiency.

    Once set, the app will provide estimated energy usage and costs, helping you track your consumption and optimise your heating schedule for better efficiency and savings.

    More options

    To log out, change your password, add a new tank, set your heat pump temperature and update any settings, use the Menu button in the top right.