![Mixergy Logotype Reversed White-3.png]](https://support.mixergy.co.uk/hs-fs/hubfs/Mixergy%20Logotype%20Reversed%20White-3.png?height=40&name=Mixergy%20Logotype%20Reversed%20White-3.png)
Check you have a 1.0 controller
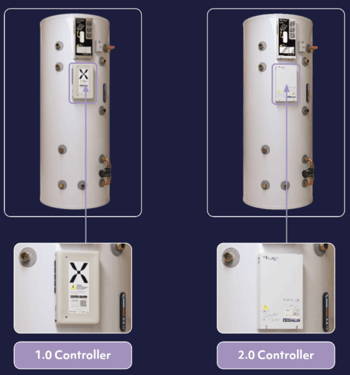
This guide is for the 1.0 controller. That's the plastic box on the front of your cylinder, with a 'X' sticker on it.
If your box is metal, and the writing is printed straight onto it, you have a 2.0 controller. Please use the 2.0 guide instead.
Your cylinder comes online in one of two ways. Either through a plug that sends the signal along your house wiring, or through a cable that runs straight from your Wi-Fi router.
The Gauge
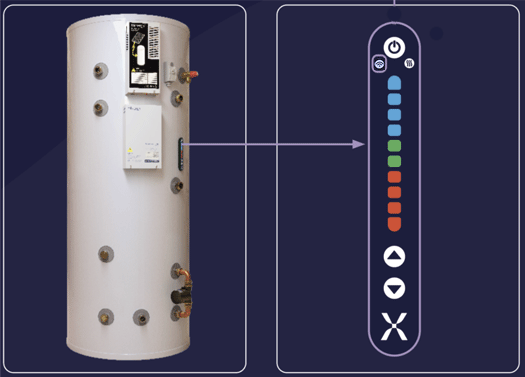
You’ll be using our Gauge to know if it’s connected, this is the strip of lights and buttons on the front of your cylinder. You can also use it to control your hot water. Find out more about it here.This applies whether you have a Mixergy X, Solar X, iHP X or Cube X.
Download the Mixergy App
- Download the Mixergy App from the App Store or Google Play.
- Open the app, tap Create Account and enter your details. If your address doesn't appear (common in new developments), type it in manually.
- Open the verification email, click the link and return to the app.
When the app asks for your Mixdevice code, scan the QR code or enter the code manually.
Where to find your Mixdevice code
The sticker with your MX number and QR code is either on the controller.
Connect your tank
There are two setups for the 1.0 controller. If a network cable runs directly from your controller to your router, you have an Ethernet setup. If you have a TP-Link plug in the wall with a cable running to your controller, you have a TP-Link setup. If you're not sure which you have, please contact your installer, housing manager or developer.
Ethernet Connection
What an ethernet setup looks like
- An Ethernet cable runs directly from the 1.0 Controller on the tank to a router, switch, or wall plate
- No powerline adapters are used
- The tank connects automatically once your Wi-Fi network is live
If the Ethernet connection is working, the Wi-Fi light on the tank will turn blue.
If there’s no blue light
- Confirm the Ethernet cable is securely connected into your router and the controller
- Check that your router or switch is powered
- Try a different Ethernet port in your router if available
- Check that the wall plate or access point is active
If you are unsure where the cable routes to, your installer or developer may need to trace the connection for you.
If the property has solar PV and an Ethernet connection
Where a property has solar panels and an ethernet connection, two network cables usually run into the cupboard with your tank, and they plug into a double wall ethernet socket. One carries your internet connection. The other carries a signal from your electricity supply to the solar diverter on the tank. Both cables look similar, and if they're in the wrong ports the tank won't come online.
You can test this yourself:
- Find the double wall ethernet socket in the cupboard with your tank. Two network leads run from it to the tank (one into the Solar Diverter and the other into the Controller)
- Unplug both leads in the double wall socket and swap them over, so each one goes into the other port.
- Check that your Wi-Fi is working and wait 5 minutes, then check the Wi-Fi symbol on the Gauge. Blue means the tank is online.
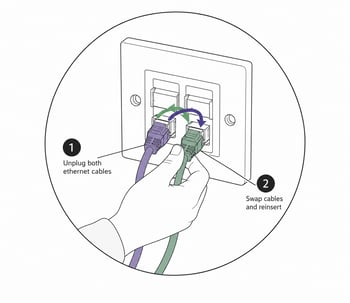
If nothing changes, put the leads back the way you found them and contact your installer. They'll need to check how the cables have been run.
TP-Link Adapter
The TP-Link kit sends your internet connection through your home's electrical wiring, from a plug near your router. Your installer should usually set this up, but in some cases you may need to do it yourself.
Step 1: Plug or check the TP-Link in and connect to your router
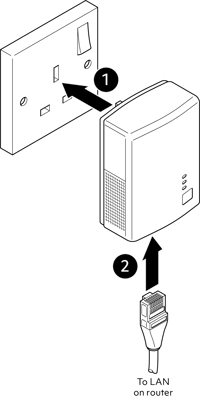
- Plug or check the TP-Link is into a standard wall socket by your router. Avoid surge-protected strips and extension leads, as both block the powerline signal.
- Plug or check an Ethernet cable is running from your Wi-Fi router to the TP-Link near it.
- Check the LEDs on the TP-Link are lit (Power, Ethernet, Data).
- If all the lights are lit, check the Wi-Fi symbol on the Gauge is blue. If it is, your tank is connected.
If it's not working, move on to Step 2. Please allow up to 5 minutes to check if your Wi-Fi symbol turns blue before trying Step 2 onwards.
Step 2: Re-power up your Mixergy tank
If the LEDs on the TP-Link are off or showing red, power the Mixergy tank of at the Gauge, then unplug and re-plug the TP-Link, then power the tank back on.
See this article to see how to turn off the tank using the Gauge.
Step 3: Pair the TP-Link with your tank
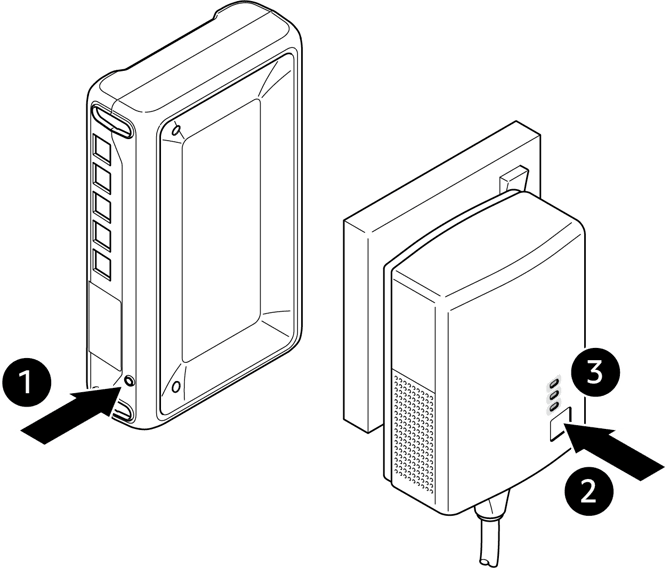
- Press and release the Pair button on the TP-Link adapter (2)
- Within 2 minutes, press and release the Pairbutton on the tank controller (1). This is on the bottom left of the controller, you will need a pen or paperclip to press it.
Once paired, the system will then automatically establish a connection.
Step 4: Check the connection lights
Look at the lights on the TP-Link plug:
- Top light (Power): shows the adapter is on
- Bottom light (Router): shows connection to your router
- Middle light (Tank): shows connection to your tank
When all three are green, your setup is complete.
Step 5: Let the system settle
Wait up to 2 minutes for everything to fully connect, check the Wi-Fi symbol is blue on the Gauge, and your tank should appear in the Mixergy App.
If it doesn't take, please try the process up to 3 times.